Introduction
Ancient India gave birth to yoga, which is now practiced worldwide. Yoga began as a spiritual and philosophical practice but now includes asanas, pranayama, and meditation. Its evolution from ancient scriptures to modern studios shows its versatility and usefulness to practitioners worldwide. Yoga remains a holistic practice that improves physical, mental, and spiritual well-being. In this guide, we will explore the 10 best advanced level of yoga poses and their simple way to do these poses. Check out our latest article on the Restorative Yoga Poses.
Definition of Advanced Level Yoga Poses and Their Significance:
Advanced yoga positions are the peak of physical competence and spiritual connection. The power, flexibility, balance, and attention required for these postures challenge practitioners to comprehend their bodies and minds. Advanced poses vary in complexity and intensity but aim to push practitioners’ physical and mental limits.
Advanced yoga poses allow for self-discovery, personal growth, and spiritual transformation. These positions encourage discipline, resilience, and a deeper connection to oneself and the world as yogic milestones.
Here are the ten best Advanced Level of Yoga Poses
Advanced level of yoga Poses
- Crow Pose (Kakasana)
- Headstand (Sirsasana)
- Handstand (Adho Mukha Vrksasana)
- King Pigeon Pose (Raja Kapotasana)
- Scorpion Pose (Vrschikasana)
- Firefly Pose (Tittibhasana)
- Eight-Angle Pose (Astavakrasana)
- Wheel Pose (Urdhva Dhanurasana)
- Bird of Paradise Pose (Svarga Dvijasana)
- Grasshopper Pose (Yoga for Arm Balance)
Review of these advanced levels of yoga poses
1. Crow Pose (Kakasana)
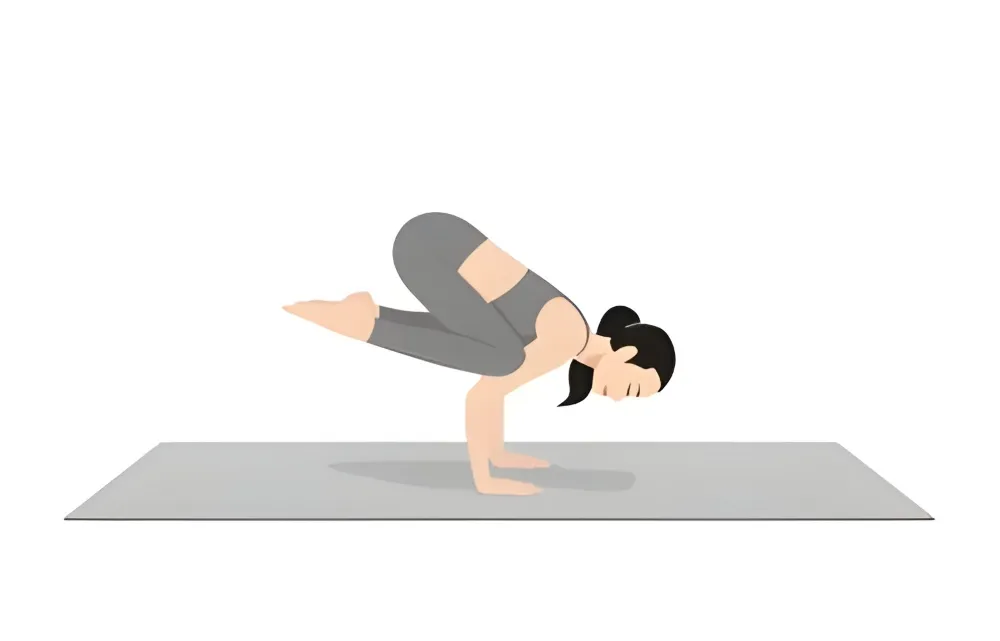
Crow Pose, also called Kakasana, is a pose where you balance your arms. It improves your strength, attention, and balance. Engaging the core and spreading weight across your arms are essential to learning Kakasana. This pose strengthens the wrists and prepares people for more challenging arm balances. It also builds self-confidence and physical coordination, making it an essential part of the trip for new and experienced yoga practitioners.
How to do Kakasana?
- Put your hands flat on the floor, shoulder-width apart, and squat down.
- Put your knees on the outside of your arms, close to your shoulders.
- Move your weight forward until you’re on the balls of your feet. Then, lift your hips.
- Look ahead and slowly lift your feet off the ground so that you can balance on your hands.
- Hold the pose for a few breaths with your arms slightly bent and your core tight. Then, let go.
2. Headstand (Sirsasana)
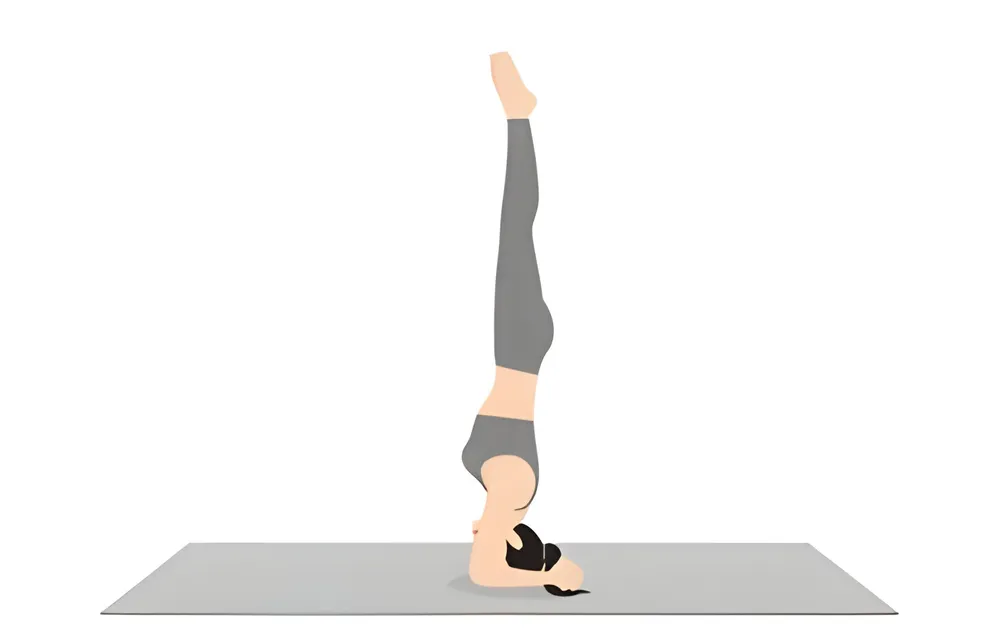
Sirsasana, or “headstand,” is often called the “king” of all yoga poses because it has many health benefits, such as better blood flow to the brain, better focus, and more muscular arms and core. It turns the ordinary effects of gravity on the body and the head, which is good for the legs and heart. Sirsasana is a pose that represents patience and persistence in your yoga practice because it needs careful growth and alignment to be safe.
How to do Sirsasana?
- Kneel on the floor, cross your fingers, and put your wrists on the mat so they are shoulder-width apart.
- Put the top of your head on the floor and hold it there with your fingers crossed.
- Stretch your legs straight and bring your feet up to your head to lift your hips over your shoulders.
- Lift your feet slowly off the ground. If you need to, bend your knees first and straighten your legs toward the ceiling.
- Hold the pose for a few breaths before slowly coming out of it. Engage your core and legs to stay stable.
3. Handstand (Adho Mukha Vrksasana)
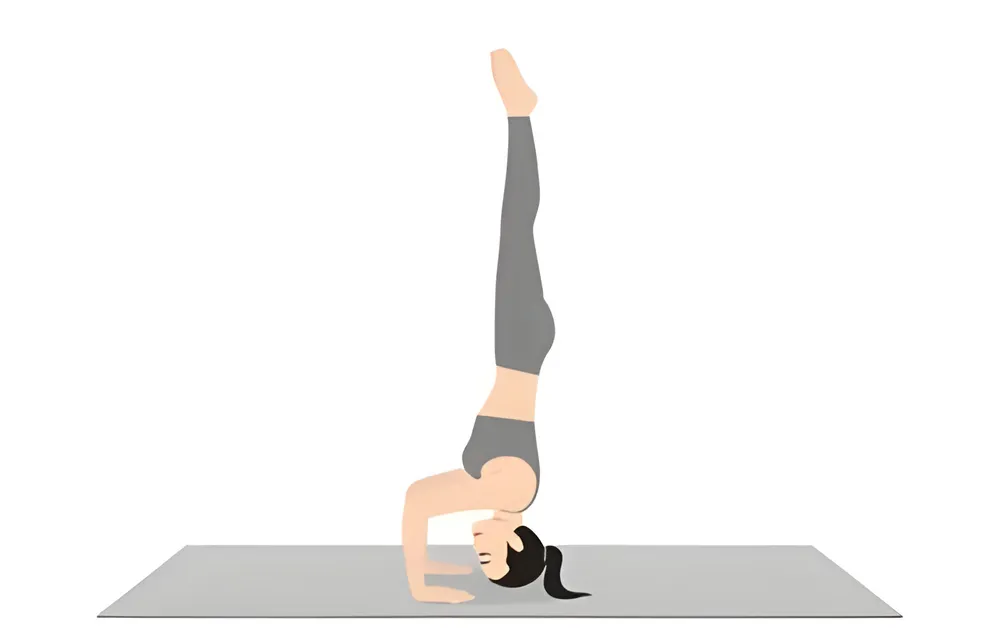
The Handstand, or Adho Mukha Vrksasana, is a dynamic pose for strength, balance, and seeing things differently. This pose works out the whole body, but the shoulders, arms, and core get extra attention. In addition to being good for your body, the Handstand strengthens your mind and helps you concentrate by pushing you to get over your fears and accept stability in the face of uncertainty.
How to do Adho Mukha Vrksasana?
- Start with your hands a few inches away from a wall and your knees bent.
- Bring your hands closer to your feet and lift one leg straight.
- Kick up the other leg with a light hop. If you need to, you can use the wall for support.
- Align your body vertically by standing up straight and putting your hands firmly on the ground.
- Focus on your core strength and balance as you hold the pose. Then, slowly come down.
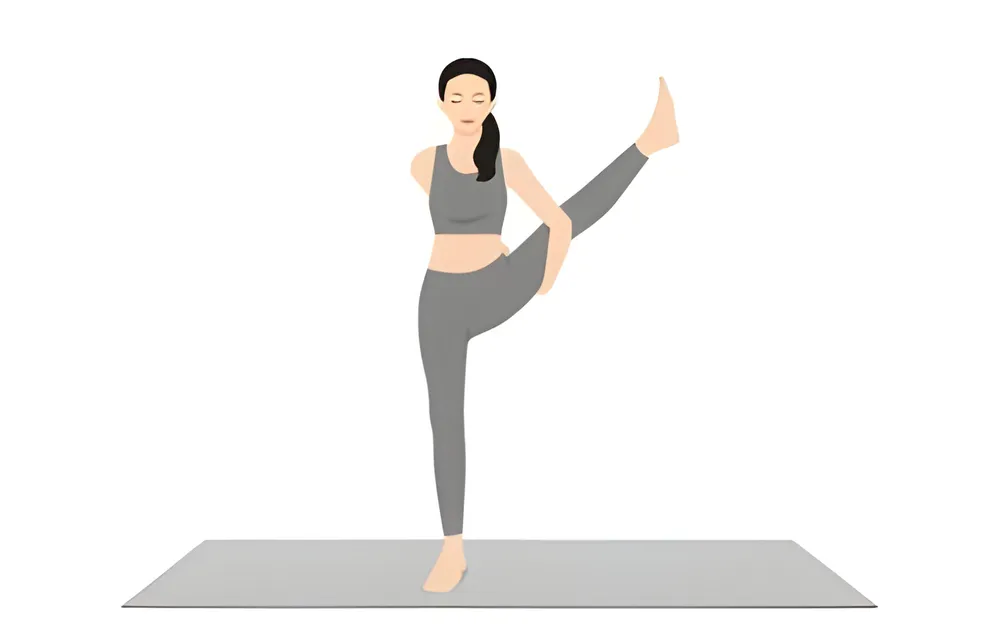
4. King Pigeon Pose (Raja Kapotasana)
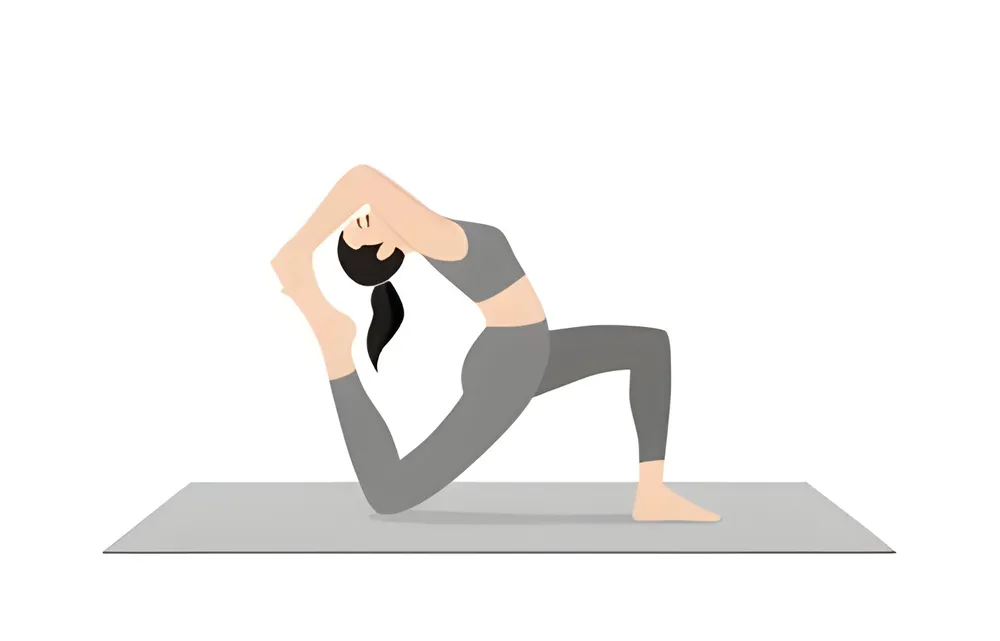
Raja Kapotasana, or King Pigeon Pose, is a deep backbend that opens the chest, shoulders, and hip flexors. It also makes the back more robust and the spine more flexible. This pose is an excellent example of the balance between strength and flexibility. It can help you feel more open in your heart than your body can allow. This is especially helpful for people who want to loosen up after sitting or standing for a long time.
How to do Raja Kapotasana?
- Start by sitting on a table.
- Take one knee and move it toward the wrist on the same side. Then, move the shin across the body diagonally and the foot to the other side.
- Bring the other leg back and straighten it. Then, bring the hips down to the floor.
- Keep your front foot bent, your hips square, and your spine long.
- If it feels good, bend the back knee and reach back with the hand on the same side to grab the foot. Lift your chest and press the foot into the hand.
5. Scorpion Pose (Vrschikasana)
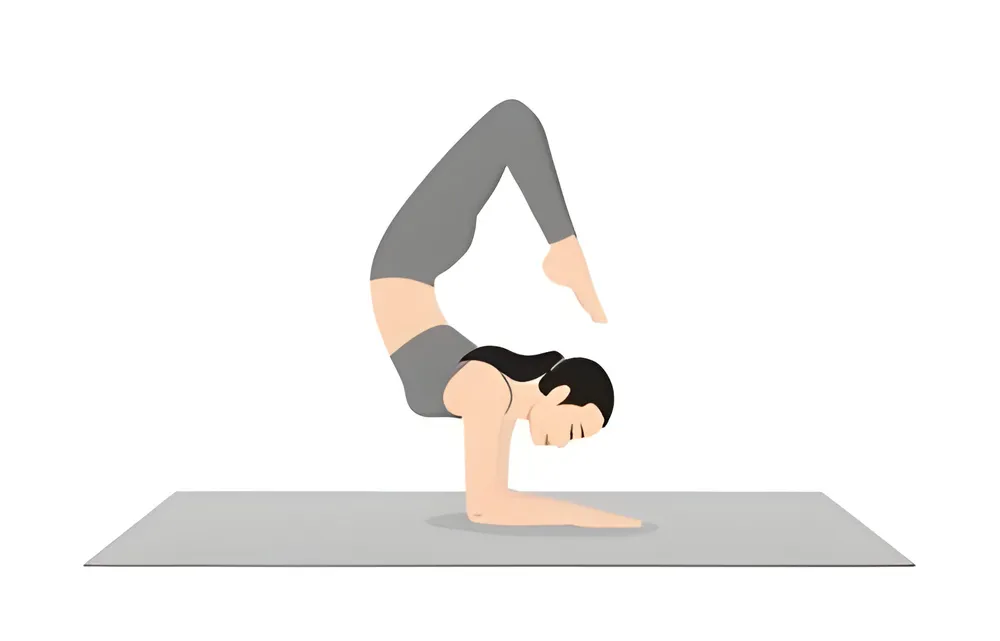
Vrschikasana, also known as Scorpion Pose, is one of the most challenging yoga poses because it combines a backbend and an inversion. This pose works the arms, shoulders, and back and requires a lot of strength, flexibility, and balance. It stands for change and the freedom to go beyond what you think are your boundaries. It also gives you deep insights into how physical and mental flexibility are connected.
How to Vrschikasana?
- Get into a forearm plank position to start.
- As you move your feet closer to your elbows, lift your hips toward the ceiling.
- Slowly bend your knees and lift one leg, keeping the other foot on the ground.
- Slowly bring the raised leg back behind your head until you reach your toes on the ground.
- Keep your core tight and your balance, then switch sides.
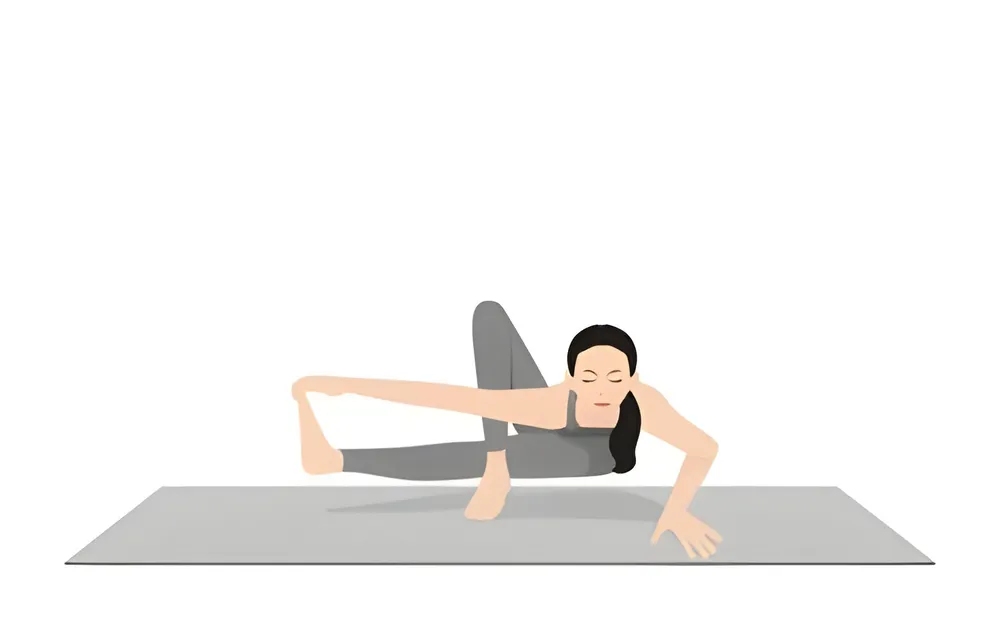
6. Firefly Pose (Tittibhasana)
Tittibhasana, also known as “Firefly Pose,” is a balanced pose for the arms that simultaneously shows your strength and flexibility. The core, arms, and legs are all worked out in this pose, stretching the back and inner thighs. It asks practitioners to lift and balance their bodies in a way that defies gravity. This represents the ease and freedom that can be gained through hard work.
How to do Tittibhasana?
- Start by squatting down with your feet hip-width apart.
- Spread your fingers before you and place your hands on the floor shoulder-width apart.
- Lift your hips off the ground and straighten your legs before you. Lean your torso forward.
- Bring the inside of your thighs as close as you can to your upper arms.
- Pull your abs in and lift your feet off the ground. Try to make your arms as straight as possible.
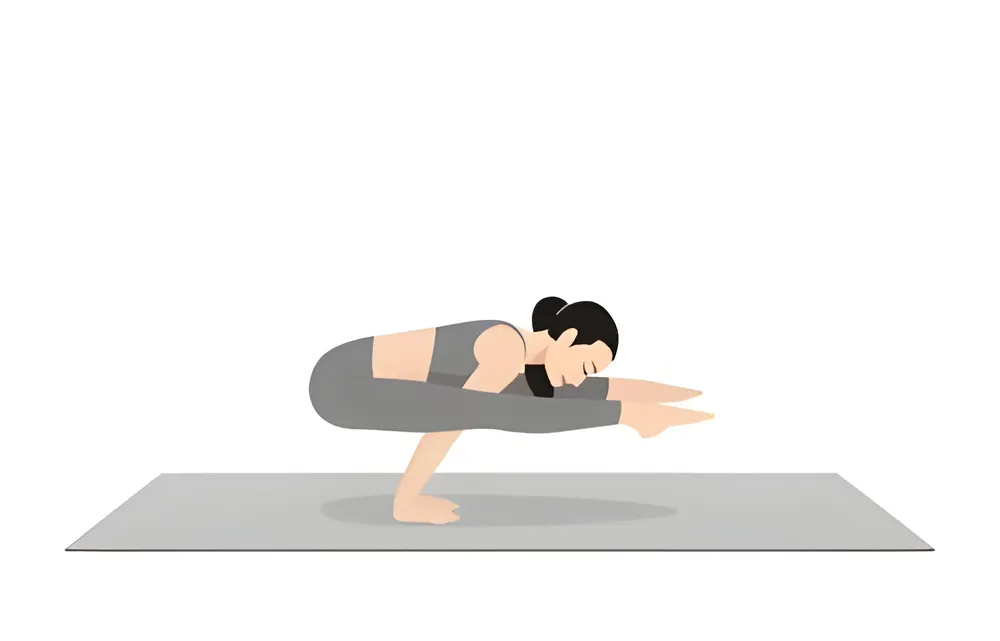
7. Eight-Angle Pose (Astavakrasana)
Eight-Angle Pose, or Astavakrasana, is a powerful arm balance that builds strength, flexibility, and focus. This pose strengthens the arms and hands and helps balance and core work. The pose, named after the sage Astavakra, represents overcoming obstacles through focus and resolve. It also includes many layers of challenge and success, like the sage’s story.
How to do Astavakrasana?
- Begin by sitting down with your legs stretched out in front of you.
- Put your right foot outside your left thigh and bend your right knee.
- Put your left foot close to your right hip and bend your left knee.
- Put your hands on the floor next to your hips so that your fingers point forward.
- Put some of your weight on your hands and lean forward a little. Then, hook your right foot around your left upper arm. Press down on your hands to lift your hips and straighten your legs.
8. Wheel Pose (Urdhva Dhanurasana)
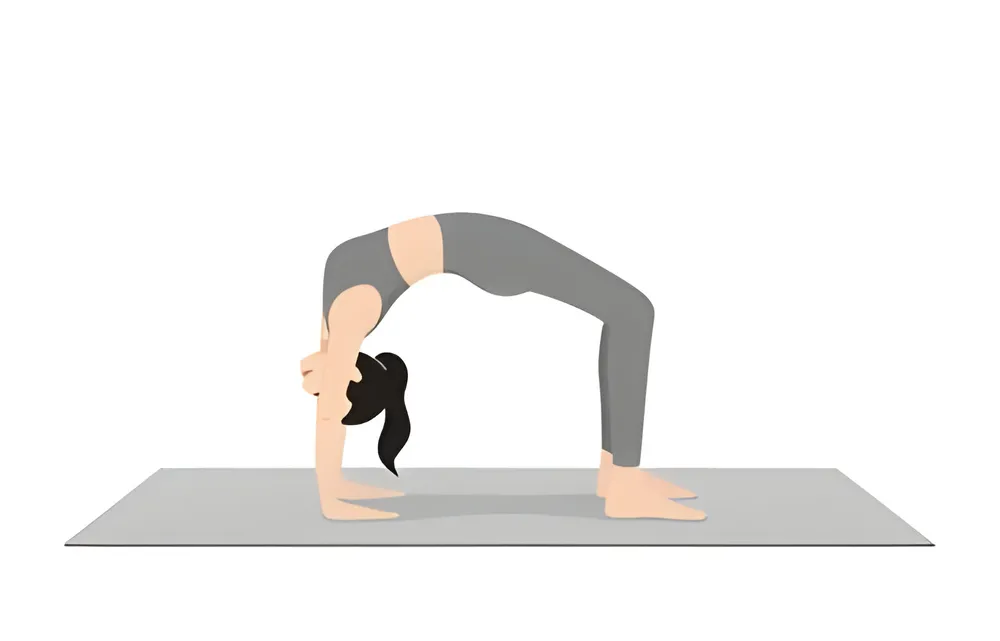
The backbend, Urdhva Dhanurasana, or Wheel Pose, is very strong. It opens the chest, lungs, and shoulders while strengthening the spine, arms, legs, and belly. People love this pose because it can wake up the body, reduce stress, and make the spine more flexible and mobile. It shows how life cycles and encourages people to be open and brave enough to accept change.
How to do Urdhva Dhanurasana?
- Lay on your back with your knees bent and your feet hip-width apart. Your heels should be close to your sitting bones.
- Lay your hands on the ground next to your head so the fingers point toward your shoulders.
- Lift your hips toward the sky and press into your palms and feet.
- Lift your chest and head off the ground, and straighten your arms as much as possible.
- Keep your legs straight and your core and glutes tight.
9. Bird of Paradise Pose (Svarga Dvijasana)
The Bird of Paradise Pose, or Svarga Dvijasana, is a standing balance pose that builds strength, flexibility, and ease. This pose tests your body’s balance and flexibility by opening your shoulders and releasing your legs, groins, and hamstrings. It stands for the beauty of change and the power of being open and honest. It encourages people to find balance in both movement and stillness.
How to do Svarga Dvijasana?
- Start by standing up straight with your feet hip-width apart.
- While holding the ankle with the hand on the same side, bend one knee and pull the foot toward the hip on the other side.
- Stretch the arm across your body straight up to the sky.
- Slowly straighten the leg that was raised while stretching the bottom arm forward at the same time.
- Once balanced, lift one leg and reach the other to the side. Keep your body straight and your arm out to the sky.
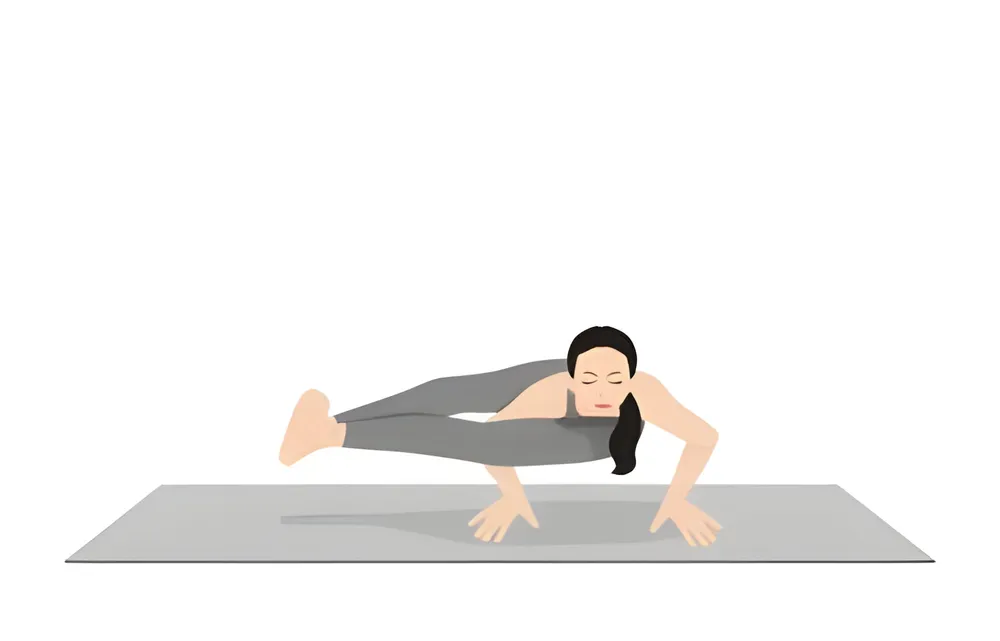
10. Grasshopper Pose (Yoga for Arm Balance)
When you do the Grasshopper Pose, your strength, flexibility, and balance are all tested. The arms, core, legs, and hips are all worked out in this pose, which also twists the body and opens the hips. Like the grasshopper, it pushes people to take on challenges quickly and accurately, showing they are flexible and robust.
How to do Yoga for Arm Balance?
- Begin by bending down with your feet hip-width apart.
- Spread your fingers before you and place your hands on the floor shoulder-width apart.
- Lean forward in the middle of your body and bend your elbows so that your upper arms rest on the backs of your legs.
- Lift one leg and hook it over the upper arm on the same side. Squeeze the leg into the arm.
- Pull your core in and lean forward. Lift your back leg off the ground and straighten it out behind you.
Conclusion
Advanced yoga positions combine physical strength and spiritual awareness. From Kakasana to the Grasshopper Pose, these ten poses are the pinnacle of physical difficulty and a profound path to inner discovery and serenity. Advanced asanas involve physical balance, strength, discipline, and self-awareness.
Each pose’s unique demands and advantages allow practitioners to transcend ordinary limitations and discover their potential. Practicing these advanced positions develops resilience, tranquility, and a deep connection to the self and world. Advanced yoga practice shows how yoga can improve physical health, mental clarity, and spiritual growth, mirroring the ancient wisdom from which it originated.